My first TSSCC event went off pretty well, if you didn't mind the 30F
temperatures and 20mph winds. Considering this was the first autocross
event of the year, I think I managed to get my bearings pretty quickly.
We did this one in the Laser, and Erica drove for the first time (well,
the second; she attended the
Learning Curve, an introductory/teaching event a few weeks ago) and managed
to keep up with me most of the way: she was four seconds off my best time.
I posted a write-up of the event for
, but I'll quote it below.
It's incredibly cold out this morning. When we checked the weather online before we left the house at 6:00 AM, it read 30 degrees, and that's before the windchill. We arrive at Route 66 Raceway, with about ten other cars already there; some suspended on jacks while their owners swap their street tires for Hoosiers, others running with drivers huddled in front of the heating vents, and still others cooling down while their drivers walk the course: some for the second or third time this morning. The TSSCC event van is partially set-up, and people are starting to wonder when check-in is going to start; everyone wants to get in line for work assignments, because the early birds get the best picks...possibly even the heated van to work the timing gear and coordinate the radios.
We start unloading the Laser; the spare tire, jack, tools, foldable chairs, snacks, helmets, and the air tank we filled up last night. We run in a street tire class, so there's no swapping of tires for us, thankfully. We check the pressures and chalk the tires; it's cold today, and so we lower the air pressure all around, because the course is going to be like driving on ice. Give the car a quick once-over, making sure we didn't leave anything loose, and we head over to the line that's forming at check-in. We're doing a two-driver car, and I'm running first today, so we pull out my magnetic numbers and slap them on the side: 234.
We sign the waiver, and grab our pre-registered check-in cards, hop in the car, and drive over to tech, where a few other cars are already lined up. One by one, the cars are inspected for loose wheels, leaks, low fluid levels, and other safety items. Since this is our first event of the year, they check our helmets for the Snell certification sticker, and apply a season sticker to the left side so the starters know they've passed tech. They slap the run sticker on the windshield, and we re-park the car in time to see the line forming for work assignments. We hop in line, and we're assigned to corner 2: the farthest end of the parking lot. No problem, I need the exercise anyway. Because we're in Street Modified, we run in heats 2 and 4, and would normally work in heat 3; because everyone wimped out because of the cold, we have to work both heats 1 and 3.
We take a walk through the course; first slowly, getting a feel for the transitions and straights, trying to get a rough idea of gearing and speeds, and most importantly, trying to imprint a mental map of the course so we don't get lost when we're out here in the car. Then we walk it again, quicker this time, putting a strategy for tackling the course. After that, we park the car in grid, and run to catch up with one of the veteran drivers who is giving a quick walk-through of the course for new drivers, or anyone who wants to know how last year's points leader would drive this course. It verifies a few strategies I had, and makes me rethink a few others; I would have taken the slalom the other way, but after mentally walking through it, he's probably right.
Just as we're getting back, the driver's meeting starts. The event director gives a quick rundown of how the event works, and you can see the camaraderie amongst the old-timers here; in-jokes fly left and right, and things move very quickly. We realize that we didn't get our wristbands that say we signed the waiver; things were a little hectic at the check-in desk earlier; we grab our bands, and before you know it, we're checking-in for our work assignment, and pounding pavement to the farthest end of the course. I spend the next two hours calling in cones and DNFs over the replacement radio we received after the first one decided it was too cold today, while Erica records it all, and our corner companions shag pylons. Everyone is in good spirits, despite the fact that we're half-frozen and the wind threatens to knock us over every so often.
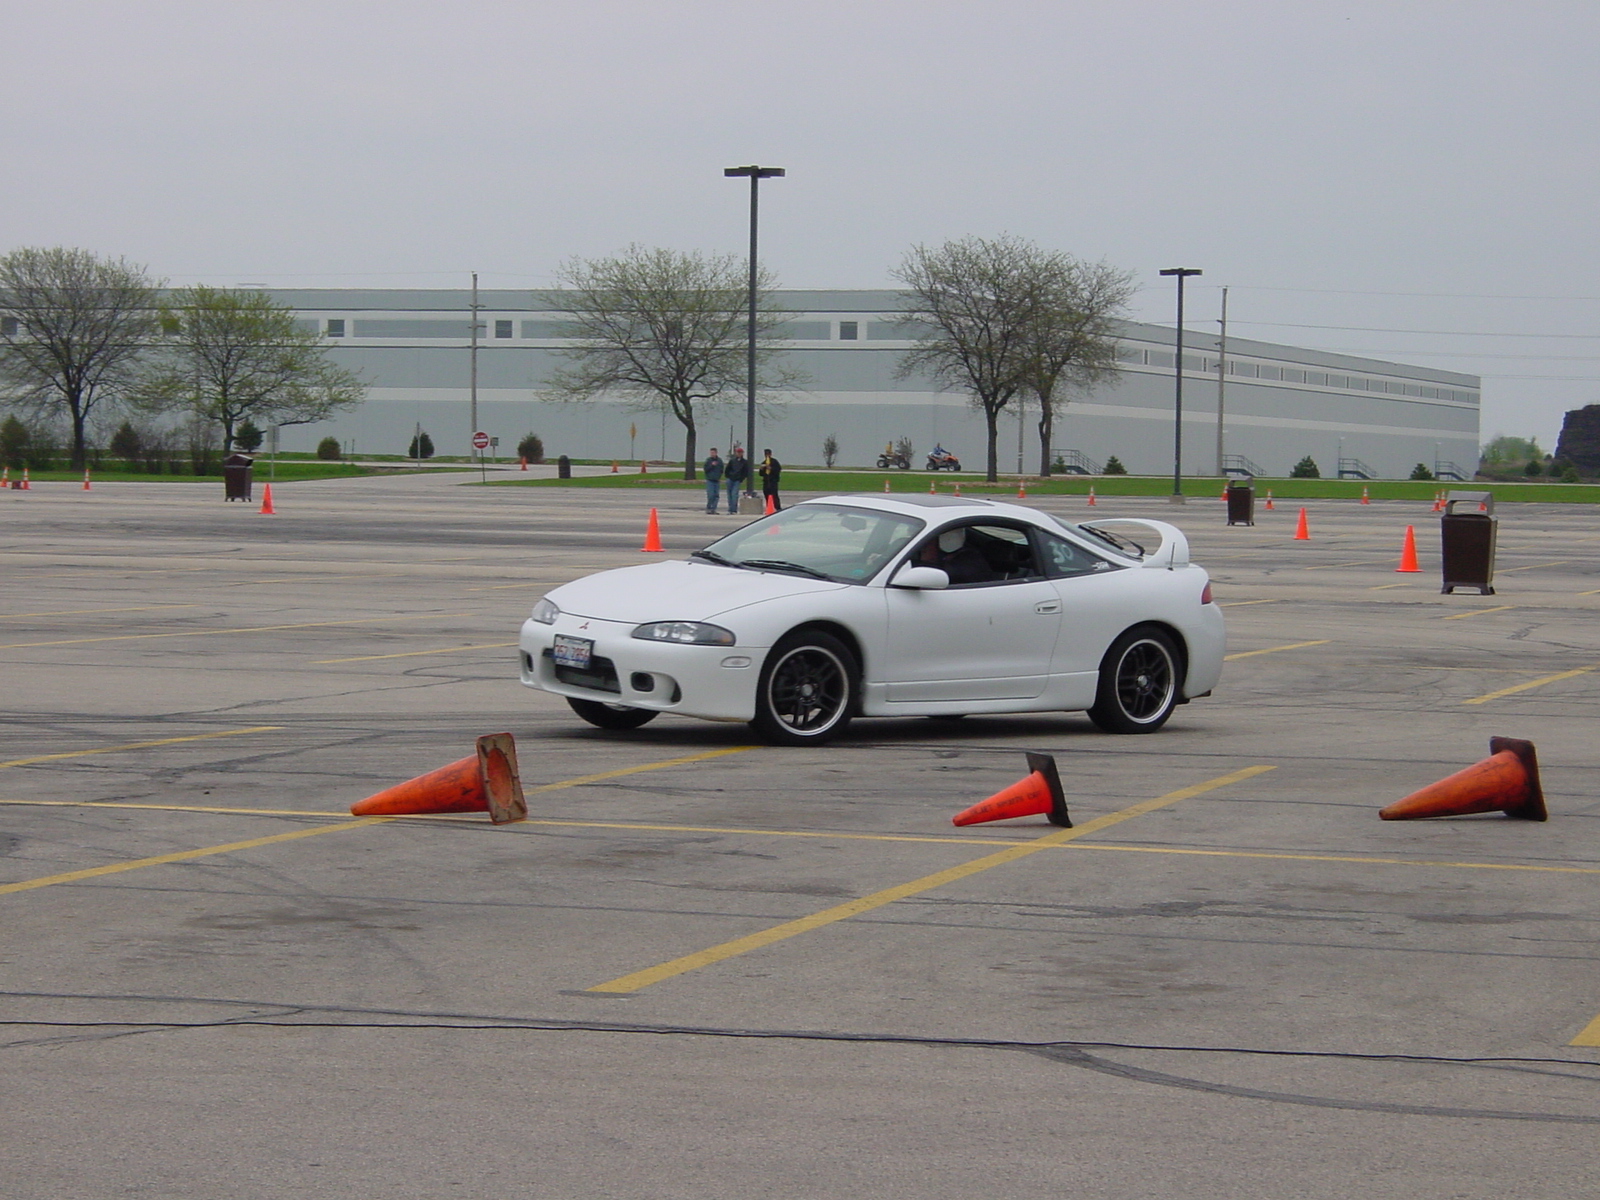
Heat one runs, which is mostly cars in stock class and a few street classes; cones fly, cars spin out because their drivers didn't expect such a cold surface, and a few runs actually make it. After three runs, it's time for heat three, which is mostly modified classes. More experienced drivers make cones fly in more interesting ways. Three runs later, we're headed back to grid, with very little time to spare to make sure everything is where we left it, and we hop in the car, and get the heat blasting while we shiver like the human popsicles we are. Erica has her helmet on; she's going to ride along and get a feel for the course from the passenger's seat.
The grid workers call up the first car in line, a white Mustang in Ladies STX, followed by a red Civic hatch in SM; same class as me, but he's on Hoosiers. They motion for me to pull out next, and I take my place in the starting line, and I see the white SM Supra pull in behind me; that thing is immaculate, and they're doing a two-driver car too; I make a mental note to try and watch one of it's runs later in the day. The hatch pulls away with a roar, the blast of a blow-off valve, and the distinctive pinging of tiny debris being ejected by the slicks. I pull up, and the starter waves me forward until I'm lined up. We wait until the Civic is about to reach the sweeper halfway down the track, and then he waves me on to start.
I let the clutch out easy; it's the first run of the day, and there'll be plenty of chances to make up time at the start and impress the ladies with an all-wheel-drive launch later. The starting gate makes an immediate hard right, so I'm shifting to second during the corner, which unsettles the car a bit; I'll have to smooth that out next time. Finish the shift, and it's a hard ninety-degree left, followed by an easy right transition. I'm winding out second pretty good at this point, and suddenly I remember the hard left and hard right coming up immediately; I threshold brake, but the wheels lock up a lot more easily than I expected. Damn, brakes are cold, and the tires are skidding like crazy. I understeer like a pig through the left, scrub off some speed, and manage to save it for the hard right, getting back on the throttle hard at the apex.
For the next few seconds, it's simple: an easy lane-change left, then back right, feathering the throttle between eight and one hundred percent. Then a bit of braking into a moderate left to a visually-deceiving corner, which I take wide to set myself up for shifting right to an identical mirror-image corner just ahead. Harder left through that one, and I'm wide open on the throttle again; pass on the left side of a couple of gates, and nearly peg the right-hand cone of the second gate. You have to take a wide approach to the next hard left, because you don't want to scrub off too much speed for the 180-degree sweeper just past it. Hard on the throttle, I can hear the tires screaming as I slide past the cone on my left, and toss the car the other way for the wide entry to the sweeper. It's a decreasing radius turn, and this first run trips me up; I take it too hot, and nearly slide through a pile of cones at the start of the straightaway. Whew, didn't peg any. I open it up.
The tach rises: 3000. 4000. 5000. I start passing a narrowing series of cones at the end of the straightaway. 6000. I'm just reaching the entry of the fast decreasing-distance slalom at the end of the straightaway, and I leave it planted: no guts, no glory. I pass the first cone of the slalom on the right. 7000 RPM. I let off, letting the engine drag scrub off speed while I concentrate on setting the car up: shift right, harder left, then shift the nose of the car straight at the next gate...bam, full throttle again just as I pass the second-last cone, and I scream past the last one like it's not there. I settle the car left through another gate, then try to move the car wide to the right so I can keep the speed up past the next hard left. Pretty good, but I'll need to set that up earlier next time; I make the left, and I'm lined up perfectly for the following gate, which slips the car left a bit, then right just a touch for the garage box coming up.
I spent all last year running with a club that was addicted to these damn boxes, and I can carry the Laser through these like they're not even there; I mash the gas, shift the weight of the car right, and aim straight for the apex cone. Then a quick weight transfer left, front wheels aimed slightly right, and pop off the gas; throttle-off oversteer, baby! Let it slide just a touch until I'm aimed at the outside cone of the box, then mash it again: the car settles back, the rear tires find their grip, and I'm on a straight line to the next gate. Dead perfect the first time, almost no speed lost, I love it when that happens; it's not very often, but you take it when you can get it.
Now it's full throttle through the gate, then slip the car left for a wide entry to the wide-radius 90-degree right turn. I made a note of this one during the walk-through: there's a patch of standing water right where I want my line to go, because it sets me up perfectly for a wide entry to the following 100+ degree corner. I wimp out and compromise the line, so I have to scrub off a ton of speed for the following corner; I'll definitely give that a proper try later, maybe after the next few cars clean up the puddle a bit for me. I take the hard left, and remember why I really wanted to go wide before: the next right-hander would have been set up perfectly into an easy transition, but now I'm understeering badly, and need to move the car hard to the right. Ugh. I snowplow around, and I'm on the final stretch: I open the car up, and hit about 5000 RPMs before I trip the timing light and shut it down, 64 seconds after the starter waved me on.
I take a slow 10mph roll back to grid, and let the adrenaline wear off a bit before I start to take stock of the pass; as usual, I'm being over-aggressive, and ending up understeering in corners that a little early braking would have resolved. But I still have five more passes, and Erica is chomping at the bit to see how she does in the same car against my times, so I have plenty of incentive to clean up my act.
By 4:00 PM, the event is over, and I find another four seconds out on the course, with Erica keeping up with me most of the way. We're cold and windburnt, and because there was no time to stop and eat, we're starving, but we wouldn't have wanted to spend our day any other way. We put the car back together, and head to the nearest restaurant and grab some ribs.
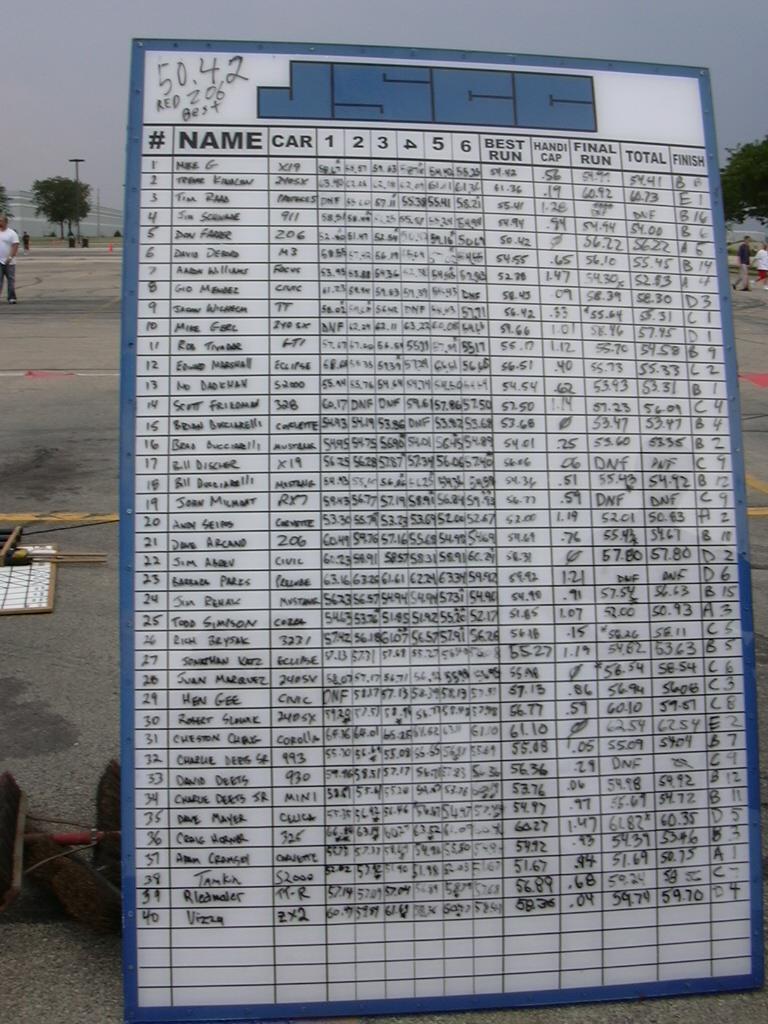
DSMtuners post
At the end of the day, I ran a 60.476 without any cones pegged, which is
about four seconds faster than my first run of the day. My runs were (+1
means I pegged one or more cones, +dnf means I...er...lose my way on
course):
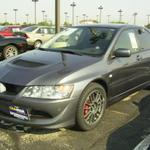 Over the weekend, after a lot of searching, we finally found a replacement
for the Jeep and Laser that I've been using as (unreliable) daily drivers:
a 2005 Graphite Gray Mitsubishi Lancer Evolution MR. Just over 31k miles
on the odometer, and the only mods I can see are an
Over the weekend, after a lot of searching, we finally found a replacement
for the Jeep and Laser that I've been using as (unreliable) daily drivers:
a 2005 Graphite Gray Mitsubishi Lancer Evolution MR. Just over 31k miles
on the odometer, and the only mods I can see are an
 We visited
 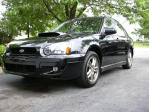 We finally broke down and bought a new car: a 2005 Subaru Impreza WRX Wagon,
in "Obsidian Black Pearl". For those who don't know, it comes equipped with
a 2.0L 4-cylinder "boxer" engine (also called a "flat four", because it has
two cylinders on each side of the crankshaft, horizontally opposed and
completely flat, like a flat V8 with half the cylinders) with a pair of
DOHC 16-valve heads and a TD04 turbo with top-mount intercooler. It's
factory rated at 227hp. The plan is to do a few minor upgrades to open the
car up a bit, then leave it alone: this is supposed to be our reliable
daily driver, not a project car like the Eclipse or Laser. We'll see if we
stick to that or not...the
We finally broke down and bought a new car: a 2005 Subaru Impreza WRX Wagon,
in "Obsidian Black Pearl". For those who don't know, it comes equipped with
a 2.0L 4-cylinder "boxer" engine (also called a "flat four", because it has
two cylinders on each side of the crankshaft, horizontally opposed and
completely flat, like a flat V8 with half the cylinders) with a pair of
DOHC 16-valve heads and a TD04 turbo with top-mount intercooler. It's
factory rated at 227hp. The plan is to do a few minor upgrades to open the
car up a bit, then leave it alone: this is supposed to be our reliable
daily driver, not a project car like the Eclipse or Laser. We'll see if we
stick to that or not...the
 With the help of

